New Student

Currently Offline
Posts: 19
A+'s: 0
Joined: Jul 16, 2011 20:52:45 GMT -6
|
Post by silvershadow on Feb 15, 2013 20:39:16 GMT -6
Before I changed out my stator, my dash lights, headlights, break and signal lights all went out at the same time. The scoot was still running fine and starting OK. The company I bought it from sent me a new regulator/rectifier........it didn't help. Then they said it had to then be the stator. So I purchased a new one, installed it and after about 3 months of the scoot sitting in my garage, I finally got all the main parts re-installed and wires connected.
Now the thing won't even start. The fan comes on (it's hard wired) and the horn blows........that's it. The battery is fully charged. I checked the wiring to ensure all connected.
Can anyone assist me with my issue???
|
|
|
|
Post by alleyoop on Feb 15, 2013 21:16:19 GMT -6
For the initial problem all your lighting out Did you check the fuses, Look for a fuse box, some are under the seat under a square cover, some can be found in the glove box etc..
Have you checked for SPARK, take the boot off the plug on the motor and if you have a spare plug that into the boot hold it on the MOTOR or VALVE cover and crank it and see if you have spark. If you have spark then it could just be a fuel problem since it has been sitting for months without running. If no spark and it has a killswitch make sure it is on the run position.
If no spark also make sure there is a good ground from motor to frame since you took some parts off.
If you have spark CHECK for fuel flow to the CARB.
take the Fuel Hose off the Carb and put it in a container and give it a few cranks FUEL SHOULD flow into the container.
Let us know what is what so far from the above results and or questions.
Alleyoop
|
|
|
|
Post by ellpee on Feb 15, 2013 23:18:18 GMT -6
This may have squat to do with your problem, as I am a very junior member, but when I had an electrical disaster with my Roketa 250, among other things I found that the little metal "slots" in my fuse box, where the fuse blades are supposed to connect, had in some cases been pushed down out of their normal position so that, MAYBE, the fuses were not getting a good, consistent contact. I manufactured a little tool to pull all those slots back up where they should be, and paid extra attention when re-inserting the fuses to be sure I didn't push the slots back out of position again, and it magically seemed to resolve a lot of electrical problems. I mention this because a lot of the lights and gauges are fed through that fusebox. Very quick and easy to check, and just might be an easy fix. If not, well, my intentions were good.
|
|
New Student

Currently Offline
Posts: 19
A+'s: 0
Joined: Jul 16, 2011 20:52:45 GMT -6
|
Post by silvershadow on Feb 16, 2013 9:42:29 GMT -6
Thanks for the speedy response guys. Allyoop, I didn't check for spark yet because the motor won't even turn or crank in order to check. Also, I'll take the battery to Auto-Zone and have them test it against a load because my tail light is now coming on, horn blows loud, fan comes on as normal, but it won't crank as if the battery is drained. I did however try to jump start it with a screwdriver between the terminals of the coil and only got a spark and the indications of a weak battery.
I will also check the fuse holder as well. I did check all my fuses before I took on the stator job and they were fine.
|
|
|
|
Post by alleyoop on Feb 16, 2013 11:59:59 GMT -6
AH, I did not realize it wasn't even turning over the motor, just about everyone that reports problems say it does not crank
or does does not turn over but what they really mean is the motor is working but it is not firring.
Have you checked if the motor is seized, get a wrench and try to turn the crank see if it turns the crank.
Alleyoop
|
|
New Student

Currently Offline
Posts: 19
A+'s: 0
Joined: Jul 16, 2011 20:52:45 GMT -6
|
Post by silvershadow on Feb 16, 2013 12:58:40 GMT -6
Is the crank located under the cover by the rear wheel?
|
|
|
|
Post by alleyoop on Feb 16, 2013 14:00:58 GMT -6
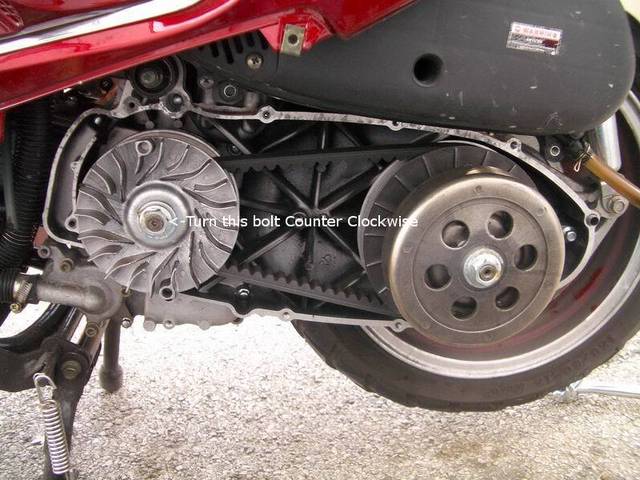
Yes, on the left side take the CVT cover off and put a wrench on the VARIATOR nut and turn it COUNTER CLOCKWISE, It should turn easy depending on if it is not on the compression stroke then a little resistance getting it past the compression stroke. But it turns over like that it is not siezed. If it won't turn or very hard to turn then something internal is damaged.
Alleyoop
|
|
New Student

Currently Offline
Posts: 19
A+'s: 0
Joined: Jul 16, 2011 20:52:45 GMT -6
|
Post by silvershadow on Feb 16, 2013 15:56:38 GMT -6
OK, the bolt in the back (where the tire is) turns freely, but the one in the front will not turn at all (either way). So I guess maybe the slotted part inside the stator housing may not have lined up accurately with the gear or something. Is there any way you can give me a call and advise me how to proceed from here?? I'm not sure if I need to take the whole assembly loose again or what  |
|
|
|
Post by alleyoop on Feb 16, 2013 16:09:39 GMT -6
The front one with the FINS on it is YOUR VARIATOR and is attached to the CRANKSHAFT that has the piston attached to it. You should be able to just grab the VARIATOR FIND and turn it with your hands COUNTER CLOCKWISE which in turn turns the crankshaft to move the piston up and down. If that does not turn NOT GOOD. Alleyoop Did not realize you took the FLYWHEEL off and stator. Did you take anything else off. Did you mess with the STARTER CLUTCH or the (IDLER GEAR) that starter turns which in turn turns the STARTER CLUTCH that then turns the CRANKSHAFT to start it. So if you cannot turn the VARIATOR in the picture check out what you changed. Actually when you take the cover off you should be able to also grab the FLYWHEEL which is on the crank just like the Variator is and turn it CLOCKWISE and it should turn the crank. Maybe by doing that you can see where it is not aligned or binding.  |
|
New Student

Currently Offline
Posts: 19
A+'s: 0
Joined: Jul 16, 2011 20:52:45 GMT -6
|
Post by silvershadow on Feb 16, 2013 19:08:50 GMT -6
Yes, as in the title of this original post and I only removed the stator cover/housing which had a slotted stem-like fitting that went to a gear. I tried to be sure everything lined back up as removed when I replaced it. I can't remember the exact inside parts but on my Roketa, the stator was screwed to the underside of the cover and not mounted on the flywheel. I used silicon gasket seal to reinstall because the new gasket I ordered didn't even line up with the housing holes.
Do you recommend me taking the stator cover back off and checking inside?? I really had a hard time with reinstalling that chrome tubing that runs from the top of the motor along the outside of the stator cover and around to the backside of motor.
BTW........the variator wouldn't turn at all. I didn't try to force it too hard nor did I use a 1/2" drive ratchet.
|
|
|
|
Post by alleyoop on Feb 16, 2013 22:07:27 GMT -6
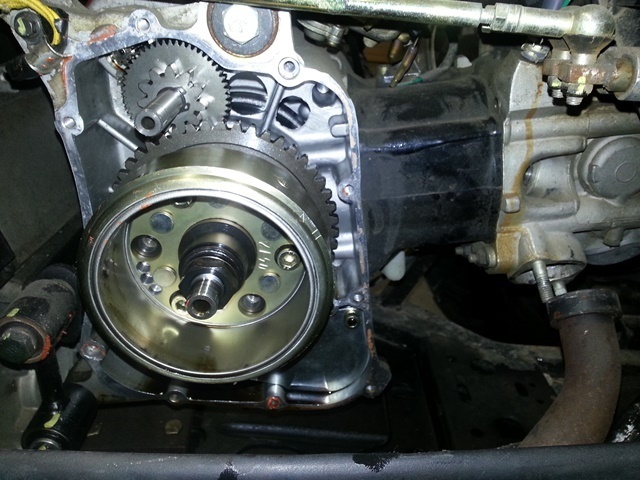
Yes, as in the title of this original post and I only removed the stator cover/housing which had a slotted stem-like fitting that went to a gear. I tried to be sure everything lined back up as removed when I replaced it. I can't remember the exact inside parts but on my Roketa, the stator was screwed to the underside of the cover and not mounted on the flywheel. I used silicon gasket seal to reinstall because the new gasket I ordered didn't even line up with the housing holes. Do you recommend me taking the stator cover back off and checking inside?? I really had a hard time with reinstalling that chrome tubing that runs from the top of the motor along the outside of the stator cover and around to the backside of motor. BTW........the variator wouldn't turn at all. I didn't try to force it too hard nor did I use a 1/2" drive ratchet. Yes I recommend you take the stator cover off and then TAKE PICTURES . Reason is the motor turned before you did this(IS THAT CORRECT?). If so something you did is causeing this now and with pictures we may be able to see what the problem is. And it probably has to to with the gears you see in this picture, which are the STARTER CLUTCH Gear and the IDLER GEAR. Or you see that shaft sticking out that the smaller gears are on THAT HAS TO Go inside a Hole built on the inside of the COVER TO HOLD IT Straight and horizontial. If you did not make sure that shaft slipped into the holder on the inside of the Cover then the shaft is angled and will bind the STARTER CLUTCH. Alleyoop  |
|
New Student

Currently Offline
Posts: 19
A+'s: 0
Joined: Jul 16, 2011 20:52:45 GMT -6
|
Post by silvershadow on Feb 16, 2013 22:16:14 GMT -6
OK Alleyoop, will do because it was running before I took it apart.
btw, do you know of an easy way to deal with the silver tubing attached to the cover??
|
|
|
|
Post by alleyoop on Feb 16, 2013 22:31:01 GMT -6
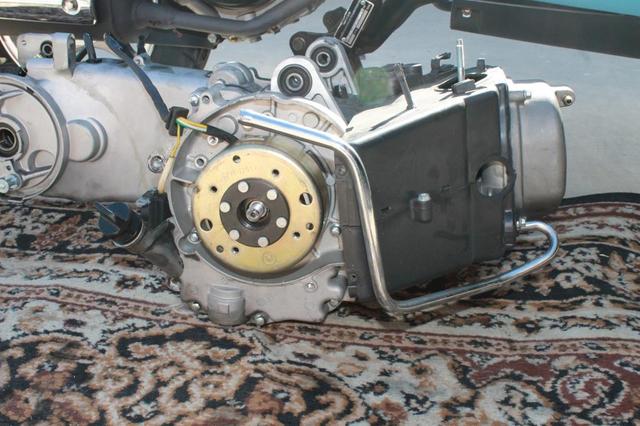
Actually that is EMISSION stuff a PAIR sytem. Most just take that off and block it off where it attachs to the motor or head and block off the Vacuum line usually going to a VALVE or Canister. Where does yours attach RIGHT Next to the valve cover on the HEAD? Take pictures of it by the valve cover or wherever it connects to as well as where it goes. Easyiest is to disconnect it from the head TWO SHORT BOLTS and then you can move it out of the way. Alleyoop You have something like this tube:  |
|
New Student

Currently Offline
Posts: 19
A+'s: 0
Joined: Jul 16, 2011 20:52:45 GMT -6
|
Post by silvershadow on Feb 16, 2013 23:38:46 GMT -6
It's attached to the housing with 3 bolts and wraps around to the back, so it's just enough in the way where the whole darn thing has to be removed. The top bolt is way up by the seat and took a very long time to try and get it back on. Attachments:
|
|
New Student

Currently Offline
Posts: 19
A+'s: 0
Joined: Jul 16, 2011 20:52:45 GMT -6
|
Post by silvershadow on Feb 16, 2013 23:43:10 GMT -6
Here's another view Attachments:
|
|

