New Student

Currently Offline
Posts: 12
A+'s: 0
Joined: Jul 9, 2011 10:24:07 GMT -6
|
Post by phildoc on Jul 16, 2011 13:56:01 GMT -6
This thread is over on Scooter Doc, but to get JR's opinion (and all other interested parties), I am posting the latest help request I have over here. If this isn't appropriate, my apologies...I just need all the advice I can get. To see the full thread, go here: .scooterdoc.proboards.com/index.cgi?board=250cc&action=display&thread=4057" rel="nofollow" target="_blank"> .scooterdoc.proboards.com/index.cgi?board=250cc&action=display&thread=4057 .scooterdoc.proboards.com/index.cgi?board=250cc&action=display&thread=4057Okay, after getting the electrical sorted out, I tried to start the bike, and I noticed a leak near the head gasket. Old owner had replaced rocker arm, and when I eventually pulled off the cylinder head cover, I discovered he had not replaced any of the cap nuts on the head bolts. I finally pulled the head, and what I found isn't pretty: Here's the top of the cylinder itself: 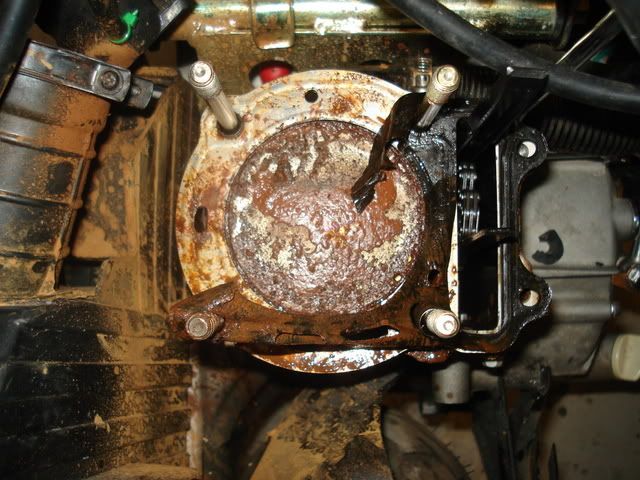 Most of the crusty stuff looks to be old radiator fluid mixed with gas (and perhaps some of the diesel fuel I dumped in there a few weeks ago to try to clean things out). What's on the cylinder head itself is fairly pliable, and can be wiped/scrubbed off. (1) My immediate question is this: what sort of solvent should I used to remove this gunk? Would Gunk carb cleaner be apprpropriate? And second, is there any sort of scrubber that I should or shouldn't use? My worry is whether taking some fine steel wool to this would mess up piston head...again what's the right product to use. Second question concerns the head gasket, which appears to be in two parts -- a metal gasket and a non-metal one that is clearly disintegrated: 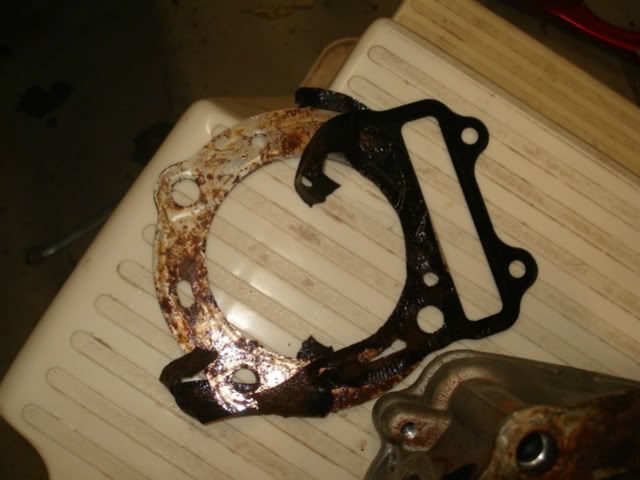 (2) I purchased a set of replacement gaskets, and I have both a metal and non-metal head gasket. Do both go on after I get this mess cleaned up? Finally, here's the underside of the cylinder head itself: 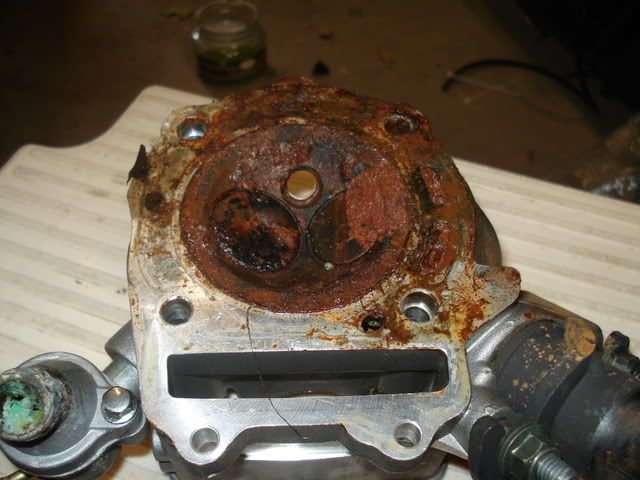 Two final questions...notice the bluish gunk clogging up the thermostat. This gunk is also is various places in the water jacket surrounding the cylinder, and clearly needs to be cleaned out. Again, recommendation on a cleaner, or a process to use? I will take the thermostat apart and check it (for now it won't come out of the cylinder head...it wiggles, but won't pull out. I gather it's because that bluish gunk is deep in there as well. Again, to summarize: (1) Best cleaner(s) to use on cylinder head and piston, and scrubbing gear that won't damage any components? (2) Best cleaner(s) and procedure to use to clean out the water jacket? Is it simpler to clean what I can see, then put it together and flush the #%*&#* out of it? (Though please note the bike has yet to start, so flushing may not be an option at this point) (3) When re-installing head gasket, do both the metal and non-metal gaskets go on? Many thanks in advance... |
|
|
|
Post by Bong on Jul 16, 2011 17:59:36 GMT -6
Just buy new gaskets!!!! A complete set is only a few bucks. DO NOT use that one again!!!! As for cleaning, you can try Carb cleaner/ lapping compound but, I think your gonna have to go ultrasonic. The damage is done. You may just wanna replace the top end. Probably cheaper in the long run. Just My Opinion. |
|
|
|
Post by tvnacman on Jul 16, 2011 19:04:38 GMT -6
the breach maybe a cracked head not the gasket , I,m not that familiar with the water cooled scooter engines . I think that scooter was overheated and the head may have cracked I would let the 250 guys who know the engine better than I do chime in . On the doc I commented about the plug was rusted that was a sign of water in the combustion chamber . If you go the route of new jug and cylinder , it would be best to flush the crank case with diesel , Pay close attention to the crank bearings , I'm unsure if the coolent runs through the lower half .
John
|
|
|
|
Post by JR on Jul 16, 2011 21:35:31 GMT -6
Welcome Phildoc and it's very obvious that this engine for whatever reason had a blown head gasket or a cracked head and has excessive water damage.
Now the question is how much work or money are you willing to spend to salvage this engine if it is worth salvaging?
I would not even consider cleaning all this up with the head and piston in place, I would remove the head and the piston and look at the piston wall and piston and go from there.
When you drained the oil was it milky looking or just oil even if it was dirty? If it was milky looking then the water made it's way into the entire system and every thing may be damaged or compromised?
If not then after removing the head and piston I would get a complete gasket set for the head and valve assembly along with new piston rings and then I would clean the head surface on each end by using a fine valve lapping compound and a very very flat piece of glass or an extremely flat metal type surface like stainless steel. One can lay the head down on the flat surface put the lapping compound on it along with some quality oil and just roll the head in a nice soft flat circle and the gasket face will polish back up very nicely and perfectly smooth and flat so the head gasket will properly seal "provided" that it's not pitted by the damage?
I would then get cyclinder hone and hone the inside of the piston cyclinder and again make sure it's not pitted.
Then I would remove the valves and do the valve head the same way with the lapping compound and flat surface then I would lap the valves to re-seat them. After removing the valves I would clean the head with a gentle steel wool and carb cleaner and then lap it on the flat surface and again do the valves.
Then if all this is a success new rings, new gaskets, new thermostat and it looks like it's in dire need of a complete radiator flushing and cleaning out!
Whew that was a mouth full! LOL
If the water made it's way through the entire engine I would consider a replacement engine if affordable and still clean up the radiator system and go from there.
If the bottom half has no water damage then I would do as I mentioned or buy just the top end of the engine and go from there.
JR
|
|
New Student

Currently Offline
Posts: 12
A+'s: 0
Joined: Jul 9, 2011 10:24:07 GMT -6
|
Post by phildoc on Jul 17, 2011 14:14:51 GMT -6
Given the advice I am getting, I will proceed by first removing the cylinder block, and trying to assess the damage. A little clean-up with diesel fuel shows the following: 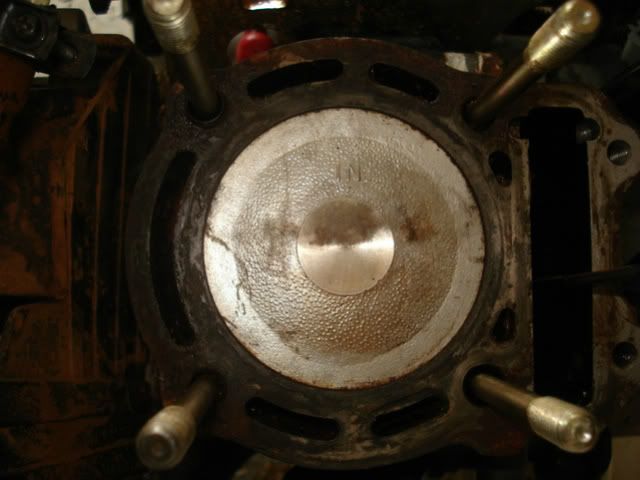 ...but I cannot pull the cylinder off. I have moved the piston before by rotating the variator nut, so should I bring the piston down and then try to pull it off? I realize that takes me off TDC, but is that an issue to worry about here? A few quick responses -- no JR, when I drained the oil it looked very clean, not cloudy or milky at all. Bong, I had no intention of reusing the old gaskets...I think I mentioned that I had purchased a whole set of replacement gaskets. My question was never having replaced a head gasket before, is the gasket essentially two pieces - a metal gasket, and a non-metal one, both installed together (metal first)? My gasket kit came with no instructions. and two head gaskets (one metal, one non-metal). Thanks again. |
|
|
|
Post by tvnacman on Jul 17, 2011 15:11:10 GMT -6
Phill did you take out all the screws , if so you need to tap it off , you need to shock to break the seal , tap it with a rubber mallet just to jar it then pull it off .
John
|
|
|
|
Post by damin69 on Jul 17, 2011 18:30:31 GMT -6
Ok Phil I rebuilt my new scooter last year. Same motor. This manual will help you along your rebuild process. mpsracing.net/helix-manual/Ok you are mentioning 2 head gaskets. This is not the case one is a Cylinder Gasket which is the paper gasket that goes under the Cylinder. The head gasket goes on top between the Head and Cylinder. The picture in the link below will help you under stand the order things go together. Take a look at this. mpsracing.net/helix-manual/06-00.html |
|
|
|
Post by JR on Jul 18, 2011 5:58:51 GMT -6
All right on there is only a single gasket on the top if it was doubled then it tells me either someone had this engine apart before and didn't know how to put it back together or a bad factory goof up?
The head is just stuck and as TV said ya got to break it loose and then go from there.
JR
|
|
New Student

Currently Offline
Posts: 12
A+'s: 0
Joined: Jul 9, 2011 10:24:07 GMT -6
|
Post by phildoc on Jul 18, 2011 9:36:15 GMT -6
Thanks to all...I have been tap, tap, tapping away and have the entire cylinder block rocking... it doesn't appear to be sticking at any corner, but no matter how hard I pull, it won't move up off the piston. The timing chain doesn't appear to be the problem. Again, I have rotated the piston without a problem, so I am surprised it is putting up such a struggle. I have been using the very online helix manual you pointed me to, damin, but it never crossed my increasingly cloudy mind to check it for the proper gasket setup. Duhhh.... Closer examination of the removed head gasket reveals that it is indeed one gasket, that has some sort of coating that is separating from the metal, on both the top and bottom of the gasket: 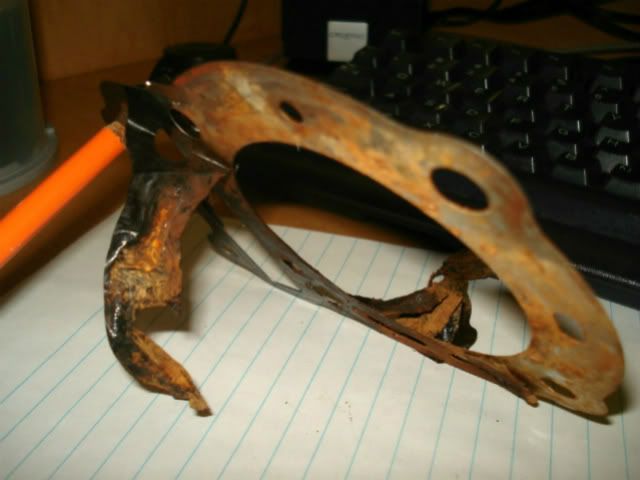 Anyone seen this before? Finally, if I can't get the cylinder block off, is there any harm to trying to rotate the piston to free up the head, or will that cause major problems with the timing when I put it all back together? |
|
|
|
Post by JR on Jul 18, 2011 10:16:15 GMT -6
Try putting the piston all the way down to the bottom and then getting it off, don't worry about the timing it's not a big deal to align the piston to TDC and put the timing chain back in proper timing.
Also phildoc could you do me a favor and that's resize your photos on your photobucket to the 680 range, the larger ones make it tough to read all of your post.
Just hit edit and resize each one and hit the replace original and it will reset all of your photos here.
Hang in there we're gonna get this thing.
JR
|
|
Sophomore
 
Currently Offline
Posts: 60
A+'s: 0
Joined: Jul 10, 2011 8:13:22 GMT -6
|
Post by insanetexan on Jul 18, 2011 10:16:44 GMT -6
In my opinion the best way I used to pull engines apart even V8 engines is to open the bottom and pull the rod cap from the piston rod and pull piston and head as all one unit. Then after removal you can lightly tap the piston top with a hammer handle to knock it out. When you put it all back together you will have top compress the piston rings to get them to slide into the head. That is best done from the top anyway (a lot easier). from looks of things you are basically rebuilding the engine anyway. Would be a good time for honing the cylinder and putting in new rings.
|
|
|
|
Post by damin69 on Jul 18, 2011 10:41:01 GMT -6
In my opinion the best way I used to pull engines apart even V8 engines is to open the bottom and pull the rod cap from the piston rod and pull piston and head as all one unit. Then after removal you can lightly tap the piston top with a hammer handle to knock it out. When you put it all back together you will have top compress the piston rings to get them to slide into the head. That is best done from the top anyway (a lot easier). from looks of things you are basically rebuilding the engine anyway. Would be a good time for honing the cylinder and putting in new rings. Tex, This would be great if it was an option. But on these engines the Conrod permanently attached to the crank. So the best option is doing as JR said bring the piston down to bottom dead center. And like he said at this point do not worry about your timing marks I worried alot about them when I first took mine apart but after taking it apart and putting it back together it is not important until you reassemble. |
|
|
|
Post by damin69 on Jul 18, 2011 10:46:41 GMT -6
Phil, This might help you out when you are working on your motor. I took lots of pictures as I was rebuilding my motor. By the way my REBUILD was not by choice you can read about my nightmare on the other board at your leisure. Anyway. Here is a link to my Motor photos. .pbase.com/damin69/motor" rel="nofollow" target="_blank"> .pbase.com/damin69/motor .pbase.com/damin69/motor When I was reassembling mine I bought a foam core board printed out the pictures that I really needed to see specific details of how it needed to go back together and use double face photo tape and put them in the order I figured I would need them in to reassemble. I sure hope that my photos will help you. If you want to give me a call PM me and will get you my number. |
|
Sophomore
 
Currently Offline
Posts: 60
A+'s: 0
Joined: Jul 10, 2011 8:13:22 GMT -6
|
Post by insanetexan on Jul 18, 2011 11:34:32 GMT -6
Damin; Thanks for the correction I did not know that. That is very interesting that they made it all one unit with the crank. Learn something new everyday. Specially on these motors.
|
|
New Student

Currently Offline
Posts: 12
A+'s: 0
Joined: Jul 9, 2011 10:24:07 GMT -6
|
Post by phildoc on Jul 18, 2011 16:30:40 GMT -6
I think step one will be to pull apart the cylinder head (remove valves, springs, etc) and dunk it in B-12 Chemtool carb and parts cleaner overnight.
Will try to rotate piston to BDC tonight to see if cylinder block can be pulled, then I'll try the same thing with tomorrow to see if it's cracked or salvageable.
Helix manual says to use "valve spring compressor" to remove cotter pins for valves -- anyone devise a workaround?
|
|

