New Student

Currently Offline
2007 YY250T "Under Construction"
Posts: 19
A+'s: 0
Joined: Feb 16, 2012 15:18:51 GMT -6
|
Post by jahunt on Feb 23, 2012 14:06:59 GMT -6
Fasssst Response! I should have some new pictures of the head gasket installation, timing chain tension installation, etc.. tonight!
In the meantime - working.
|
|
New Student

Currently Offline
2007 YY250T "Under Construction"
Posts: 19
A+'s: 0
Joined: Feb 16, 2012 15:18:51 GMT -6
|
Post by jahunt on Feb 23, 2012 13:22:32 GMT -6
Head Gasket is being delivered today!
Quick question, there is a breather hose coming from the gearbox/rear-CVT case. Does this remain vented to open air or should it connect to the airbox?
|
|
New Student

Currently Offline
2007 YY250T "Under Construction"
Posts: 19
A+'s: 0
Joined: Feb 16, 2012 15:18:51 GMT -6
|
Post by jahunt on Feb 23, 2012 11:21:11 GMT -6
Also, the headstuds are in my opinion cheap on these things, an upgraded option would be great to keep from head gasket issues.
|
|
New Student

Currently Offline
2007 YY250T "Under Construction"
Posts: 19
A+'s: 0
Joined: Feb 16, 2012 15:18:51 GMT -6
|
Post by jahunt on Feb 23, 2012 10:42:15 GMT -6
Hmmm, if carrying Nitrous Oxide kits, remember a few things.
Nitrous adds a great amount of torque. Nitrous should never be sprayed when close to idle or you will send the rod through your motor.
A forged piston and rod would be necessity. Also, a boost in fuel, either through jetting or FPR would be needed along with a cooler plug.
|
|
New Student

Currently Offline
2007 YY250T "Under Construction"
Posts: 19
A+'s: 0
Joined: Feb 16, 2012 15:18:51 GMT -6
|
Post by jahunt on Feb 22, 2012 19:53:22 GMT -6
Wow! Very cool and fine work. Reading through before I looked at the pics, I was thinking to my self "hack job".
Again, keep up the good work. That is going to be a marathon project for sure!
|
|
New Student

Currently Offline
2007 YY250T "Under Construction"
Posts: 19
A+'s: 0
Joined: Feb 16, 2012 15:18:51 GMT -6
|
Post by jahunt on Feb 22, 2012 18:32:43 GMT -6
The TDC mark is about 25% away from TDC. Very odd why they would mark them this way.
|
|
New Student

Currently Offline
2007 YY250T "Under Construction"
Posts: 19
A+'s: 0
Joined: Feb 16, 2012 15:18:51 GMT -6
|
Post by jahunt on Feb 22, 2012 18:31:01 GMT -6
I like the idea on retorquing the head. The head studs on these motors are weak, if there was an aftermarket performance alternative I would buy them.
Always used ARP Headstuds on my turbo vehicles. Helped the head from lifting under boost.
|
|
New Student

Currently Offline
2007 YY250T "Under Construction"
Posts: 19
A+'s: 0
Joined: Feb 16, 2012 15:18:51 GMT -6
|
Post by jahunt on Feb 22, 2012 18:21:11 GMT -6
Not ignoring the post today, just cleaning up the machined surfaces on the head and cylinder with a 3M scotchbrite pad tonight waiting for the gasket to get here Friday. Since I didn't pull the valves from the head, I didn't want to get Sand paper grit near the valve seals. Same with the cylinder(still on bike), no way to block the water jackets. Always used scott pads in the past, with a final cleaning of paper towels and brake cleaner before I lay the gasket down.
The timing marks on the flywheel don't align with TDC(seems to be a common problem), so I'm just going to put the piston to visual TDC, then install the cam lobes facing down(Also aligning the cam gear holes with the head surface). Any other tips on timing/alignment?
|
|
New Student

Currently Offline
2007 YY250T "Under Construction"
Posts: 19
A+'s: 0
Joined: Feb 16, 2012 15:18:51 GMT -6
|
Post by jahunt on Feb 21, 2012 8:39:31 GMT -6
Ordered the gaskets from monsterscooterparts.com. Why from them? Well I ordered a diode from them last week and it came in 3 days so I appreciate the speed. This vendor doesn't carry everything for our scoots though. I got the complete engine gasket kit for $18 shipped. Haha, unreal how cheap the parts are. I did notice that the picture was showing 3 holes in the head gasket near the timing chain area, where as my bike only has 2. Hopefully it is just a spare  |
|
New Student

Currently Offline
2007 YY250T "Under Construction"
Posts: 19
A+'s: 0
Joined: Feb 16, 2012 15:18:51 GMT -6
|
Post by jahunt on Feb 20, 2012 20:51:38 GMT -6
JR, That guy seemed to give a random guess on every time I would post, almost as if he was trying to add to his post-count or something. I appreciate his kindness and wanting to help but he just adds confusion to trying to get educated answers. Had to put a stop to it... kindly. Haha. So tonight was a good night. I have solved what I hope to be the last major issue prior to this thing being roadworthy. Unfortunatly, I was in a rush (wife was wanting to relax a bit tonight), but managed to snap a few shots during the head removal. So to simplify things, you need to remove everything and get your scooter's components down to this level. This involves removing lots of nuts, bolts, and screws (bike plastics, seats, carburetor, engine electrical connections, and fluids). No special tools required. For those who don't understand the way that your motor, electrical, and vacuum lines work, be SURE to mark those items for faster reassembly. Anyone can do this if you mark where things go. Also, after 20 years of working on engines this is a huge tip, experienced or not - PUT BOLTS BACK IN THE HOLES IF YOU CAN, or clearly mark them on paper, cardboard, or with pictures. Here is the starting point for purposes of replacing a headgasket: 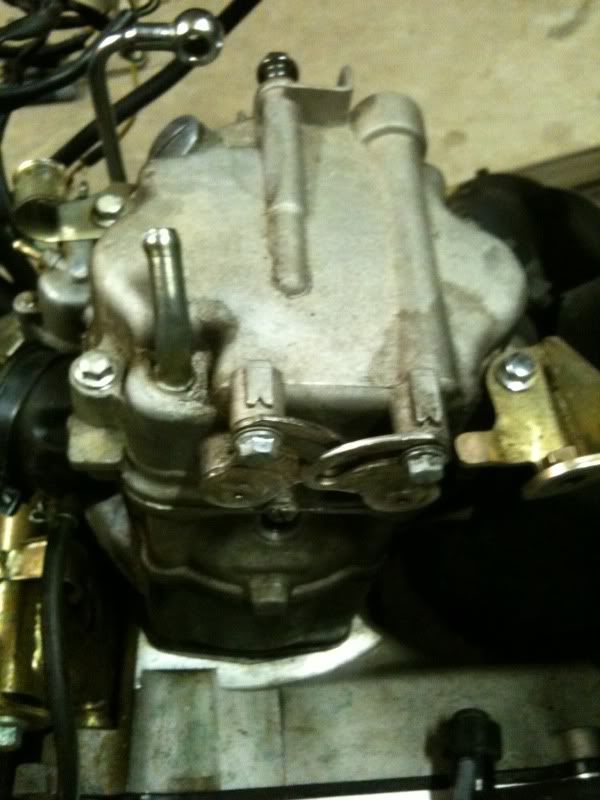 OK - start by removing #1, the oil feed line for the head (chrome line). #1 is actually a banjo bolt. Retain the copper washers and place the bolt back and washers back in the head so you don't lose them. Next, remove #2 & #3. These are the exhaust bolts (12mm). You won't be able to remove the head with these attached. I took it one step further and removed the 2 x front 12mm bolts holding the muffler on so I didn't have to shimmy the head off as much. 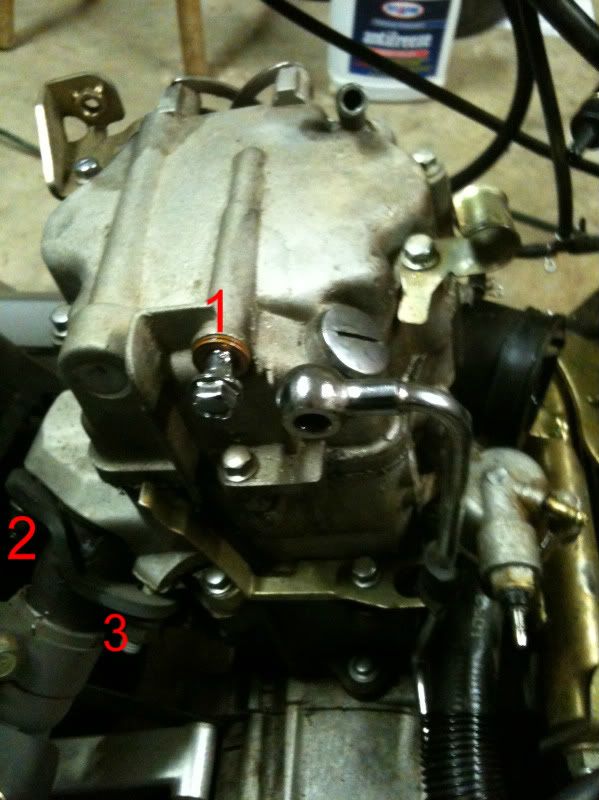 Next, get the valve cover off. This will require removing 6 x 8mm bolts. I must say that once everything is removed, there aren't any tough bolts to get too. You will see #5 and # 6 are closer to the base of the valve cover than 1 - 4. Important: once loosened all the way, leave the bolts in the holes so you don't mistake the different lengths. Once these 6 bolts are loosened, the valve cover will come directly off. Hit it a few times with a rubber malat if the gasket is holding tight. DO NOT PRY with a screw driver. 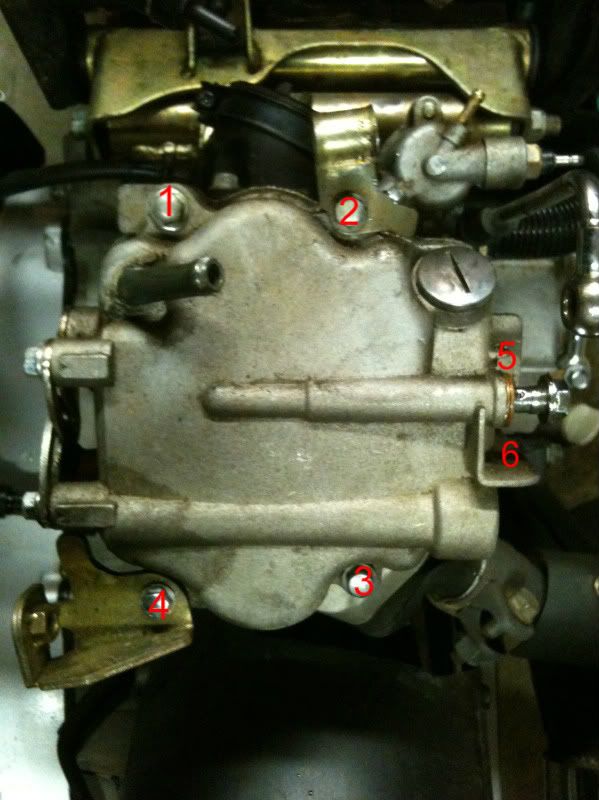 So before proceeding, you should "try" and find TDC (Top-dead-center). There is a large silver flat head screw on the right side of the engine's crankcase cover. Remove this screw (it is basically a window to flag TDC). Take the black plastic CVT cover off of the left side of the engine (3 x phillips screws). Under this cover, there will be a 17mm nut. Turn this nut until you see a black indicator in the "window" on the other side of the engine. You may need 2 people to do this. While turning the engine over, I notice mutliple markings so I picked the most prominant (which turned out to be incorrect). 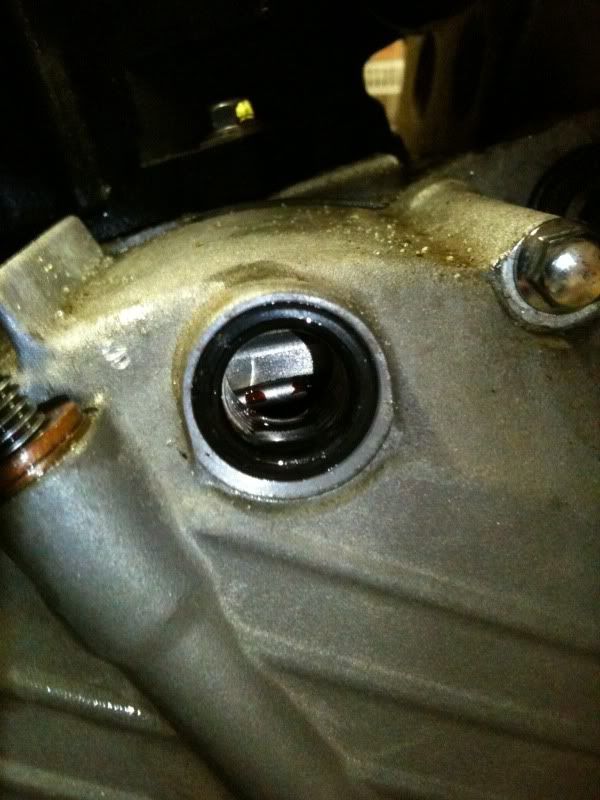 So for removing the head, There is 3 parts. 1.) Mark it 2.)Remove Cam 3.) Remove Head Bolts. First, mark the dashed areas with nail polish. Be sure to hit that timing chain. Even if you aren't at TDC, you will be able to reassemble the same as you disassembled. Second, remove A & B; the cam retainer. Once you remove the retainer, push the timing chain tensioners outwards and remove the cam. Third, remove the 4 x 12mm head bolts. 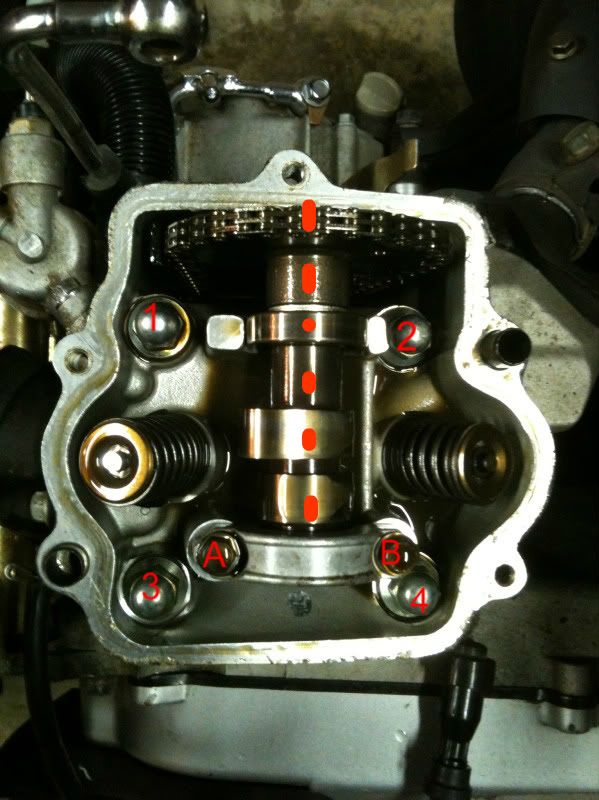 Next, PULL THAT HEAD OFF! I didn't experience any resistance. It slide right off, but if you do... smack it with a rubber malat a few times. DO NOT PRY between surfaces as you will damage the machined surfaces (that's a bad thing). 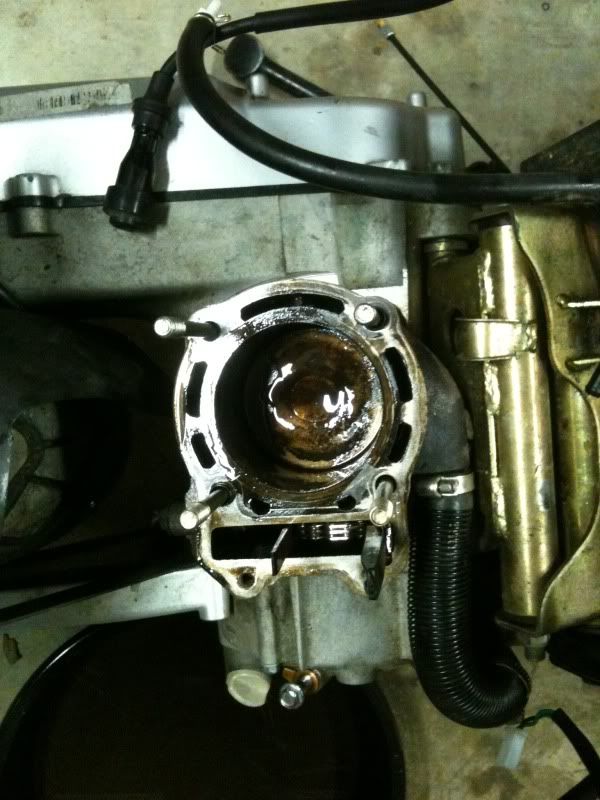 After you have the head off, you can push the piston to the bottom of the cylinder for inspection of the cylinder walls. In my case, they are in 100% perfect condition. No scoring, scratches or abnormal wear. If you see any signs of wear, replace it, they are cheap! You will notice my cylinder looks sloppy in the picture. As soon as you complete your inspection, MAKE SURE you soak it down in oil. If you don't, you will come back to a rusty cylinder within 24 hours. So, this is where I leave this post until parts come in. Below you will see some major headgasket leakage between the combustion chamber (center) and water jacket (smaller holes outline the cylinder). It even appears there could have been some minor leakage on the right side as well. 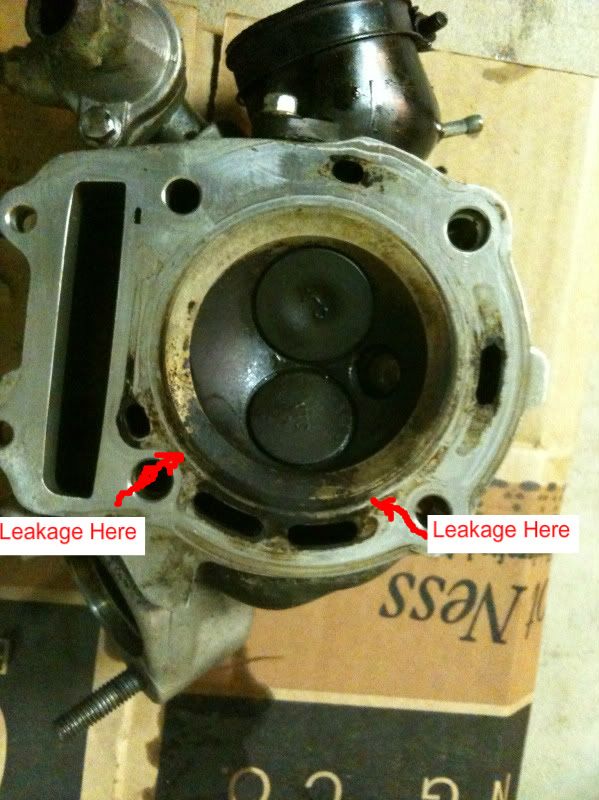 Here you will see the headgasket itself, really not in bad shape so I will need to make sure the head isn't warped. 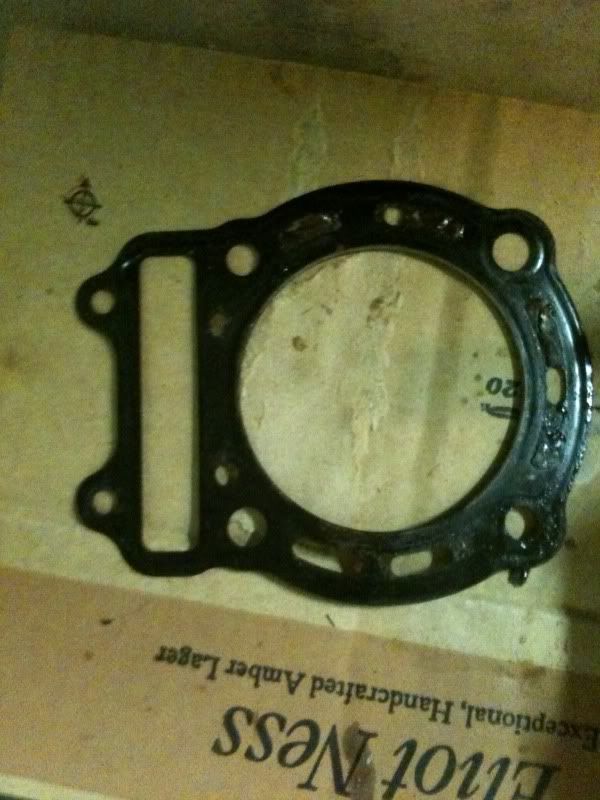 |
|
New Student

Currently Offline
2007 YY250T "Under Construction"
Posts: 19
A+'s: 0
Joined: Feb 16, 2012 15:18:51 GMT -6
|
Post by jahunt on Feb 20, 2012 8:43:51 GMT -6
Damin69 - thanks for the tip on rebuilding the motor while on the bike. I was just pondering the idea last night if I should yank it off or not. I have quite a bit of things removed, so the space is there. Also, I see you mentioned "wrong parts". This is exactly what I don't want to happen. Can you show me where exactly you purchased your kit from?
Cruiser - Definitely overheated at one time. While in my initial "wiring stage" I noticed at the bottom of the radiator that aplug was corroded through. I'm assuming that this is a temperature sensor for the fan; which probably never came on. This plug has been replaced now.
JR - I am certainly leaning towards the rebuild kit itself rather than gaskets. More than likely there will be corrosion since the bike sat for 6 months or so with this issue. I will probably stay clear of any big bore kits as I was plenty happy with my 150cc in the past, let alone having a 250cc now.
Can anyone guide me in the right direction for the piston ring compressor tool that they used?
Since I haven't seen a real clear tutorial on a top end rebuild, I'm going to take the time to document the process as I move forward. As mentioned in my introduction, I have built car motors from the block up in the past, and a few top ends on 2 stroke dirtbikes about 15 years ago. Never had any issues yet!
Thanks all!
|
|
New Student

Currently Offline
2007 YY250T "Under Construction"
Posts: 19
A+'s: 0
Joined: Feb 16, 2012 15:18:51 GMT -6
|
Post by jahunt on Feb 19, 2012 13:33:41 GMT -6
Well - bad news. I had the major components back together today, changed out the oil/coolant/sparkplug, and gave her a shot. Fired right up again, but with coolant in the motor, she spewed white coolant smoke out the exhaust. So much coolant that it was dripping off the tip of the muffler.
Yanked the spark plug and it had coolant on it as well.
Poop. What direction to take at this point?
|
|
New Student

Currently Offline
2007 YY250T "Under Construction"
Posts: 19
A+'s: 0
Joined: Feb 16, 2012 15:18:51 GMT -6
|
hello
by: jahunt - Feb 17, 2012 22:28:32 GMT -6
Post by jahunt on Feb 17, 2012 22:28:32 GMT -6
Hi there! If you live near Pittsburgh like me then you live in S.W. PA, not S.E. PA  |
|
New Student

Currently Offline
2007 YY250T "Under Construction"
Posts: 19
A+'s: 0
Joined: Feb 16, 2012 15:18:51 GMT -6
|
Post by jahunt on Feb 17, 2012 20:08:22 GMT -6
I just filled the cooling system up through the filler under the seat. Like I said, no cap for the filler under the seat area. Cranked it over and it shot 3 huge chugs of coolant across the garage. Is that normal or do I have a head gasket issue?
Also, when running it only had the carburetor on. No airfliter/airbox. Will that affect it?
|
|
New Student

Currently Offline
2007 YY250T "Under Construction"
Posts: 19
A+'s: 0
Joined: Feb 16, 2012 15:18:51 GMT -6
|
Post by jahunt on Feb 17, 2012 19:36:22 GMT -6
Woohoo! Cleaned out the jets and cleaned the carb out. Put it back on, hooked up the vac lines and cranked and cranked. Nothing. Loosened up the valve adjustments all the way and cranked again. ITS ALIVE! Scared the heck out of me when it started haha.
I don't have any coolant in it and don't have a cap for the filler hose. Can I pick one up at the auto parts store? It was blowing nasty water (what was left) out of the filler whole when running.
It doesn't want to rev at all. Will go up maybe too 3000 RPMs then choke out. Air fuel screw is at 2.5 turns out on the bottoms of the carb. Tried adjusting the valves during idle and if you push at all against the tension it kills the motor. How hard exactly should I push on them before I tighten the adjustment bolts? Even with them dead loose it won't rev up.
|
|

